Docker 中使用 linux namespace 机制来隔离不同容器的网络配置。
简而言之,一般情况下每个容器有一个独立的 network namespace,这个
namespace
和主机的网络配置是隔离的,而他们之间通过一条虚拟链路以及网桥相连。
接下来的过程通过命令行模拟了这个网络建立的过程,以便粗浅的理解 linux
namespace 的原理。
目标
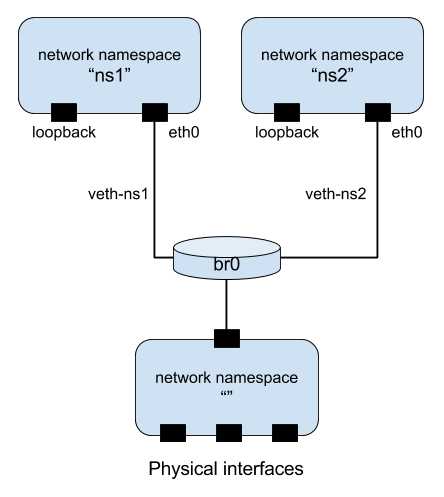
最终网络拓扑如下图所示。在 Docker 中,网桥的名字是 docker0。
操作
首先创建网桥:
1 2 3 4 5 6 7 8 brctl addbr br0 brctl stp br0 off ifconfig br0 192.168.10.1/24 up
然后创建一个名为“ns1”的 network namespace:
创建一个虚拟链路,两端分别对应 ns0 中的一个 interface
(veth-ns1) 和主机上的一个 interface
(br0.1),显然这条链路连接了 ns0 和 default namespace
1 2 3 4 5 ip link add veth-ns1 type veth peer name br0.1 ip link set veth-ns1 netns ns1
进入“容器”(namespace ns0)内部,做一些操作:
1 2 3 4 5 6 7 8 9 10 11 12 13 14 15 16 17 18 19 20 21 22 23 24 25 26 27 28 29 30 31 32 33 34 35 36 ip netns exec ns0 sh $ ls /sys/class/net veth-ns1 $ ip link set dev veth-ns1 name eth0 $ ifconfig eth0 192.168.10.11/24 up $ ip link set dev lo up $ ifconfig eth0 Link encap:Ethernet HWaddr 7a:41:f4:e4:44:92 inet addr:192.168.10.11 Bcast:192.168.10.255 Mask:255.255.255.0 UP BROADCAST MULTICAST MTU:1500 Metric:1 RX packets:0 errors:0 dropped:0 overruns:0 frame:0 TX packets:0 errors:0 dropped:0 overruns:0 carrier:0 collisions:0 txqueuelen:1000 RX bytes:0 (0.0 B) TX bytes:0 (0.0 B) lo Link encap:Local Loopback inet addr:127.0.0.1 Mask:255.0.0.0 inet6 addr: ::1/128 Scope:Host UP LOOPBACK RUNNING MTU:65536 Metric:1 RX packets:0 errors:0 dropped:0 overruns:0 frame:0 TX packets:0 errors:0 dropped:0 overruns:0 carrier:0 collisions:0 txqueuelen:1 RX bytes:0 (0.0 B) TX bytes:0 (0.0 B) ip route add default via 192.168.10.1
最后,回到 default namespace,把链路这头的 br0.1
打开
1 2 3 4 5 ifconfig br0.1 up brctl addif br0 br0.1
好了,这时候已经能 ping 通“容器”的IP地址了:
1
2
3
root@eric-vm:/home/eric PING 192.168.10.11 (192.168.10.11) 56(84) bytes of data. 64 bytes from 192.168.10.11: icmp_seq=1 ttl=64 time=0.034 ms
如果想访问外网,还要额外做两件事——把你的主机配置成一台工作在 NAT
模式的路由器:
1 2 3 4 5 echo 1 > /proc/sys/net/ipv4/ip_forwardiptables -t nat -A POSTROUTING -s 192.168.10.0/24 -o eth0 -j MASQUERADE
通过同样的方法你可以创建更多的 network
namespace,这里就不重复了。
